Marking up screenshots is one of those things you don't think about until you need it. You're filing a bug report, explaining a design change to a client, or documenting a process for your team — and a plain screenshot just isn't enough. You need to circle something, add an arrow, blur out sensitive info, or drop in a quick note.
macOS gives you two built-in ways to do this, and there's a third option if you share screenshots regularly. This guide covers all three methods so you can pick the one that fits your workflow.
First: Capture Your Screenshot
Before marking up, you need to capture a screenshot. macOS offers several ways to do this:

- Whole Screen: Press
Shift + Command (⌘) + 3to capture the entire screen. - Selected Portion: Press
Shift + Command (⌘) + 4, then drag to select the area you want to capture. - Window Capture: Press
Shift + Command (⌘) + 4 + Spacebar, then click on the window you wish to capture.
Screenshots are saved to your desktop by default.
Method 1: Using Preview for Markup
-
Open the Screenshot: Find the screenshot on your desktop (or wherever you've saved it). Right-click the file, select
Open With, and choosePreview. This is the default image viewer on macOS and a powerful tool for markup. -
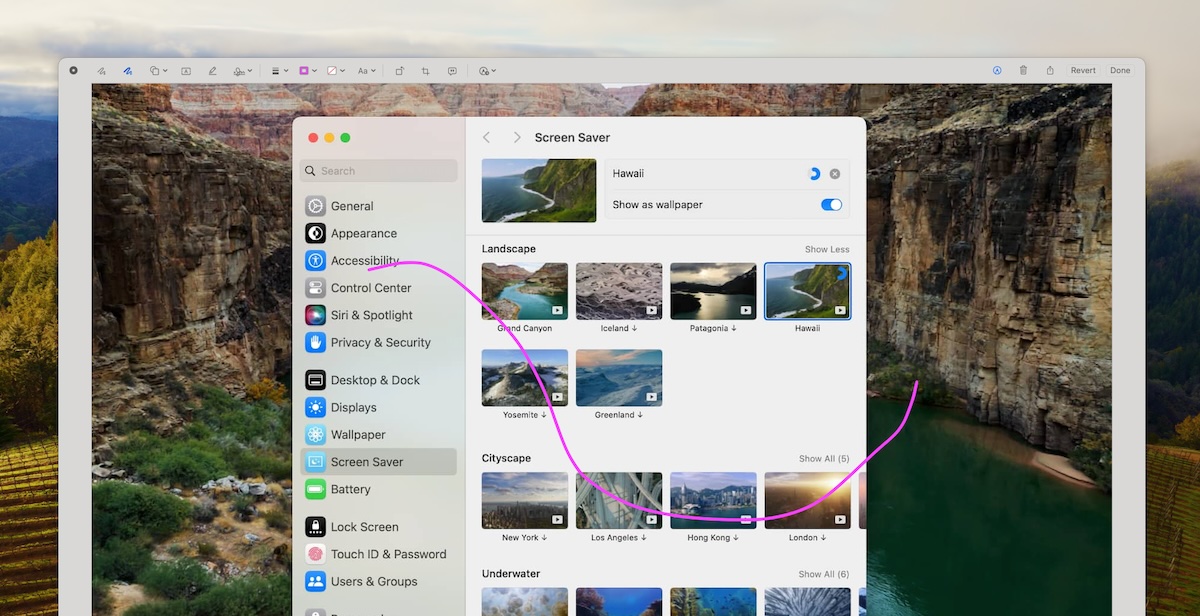
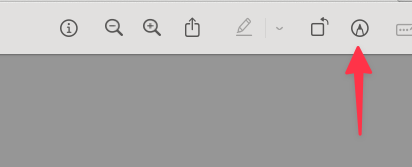
Accessing the Markup Toolbar: In the Preview app, click on the markup toolbar button (the pen tip icon) to reveal the markup tools.
-
Selecting a Tool: The markup toolbar offers various tools for markup:
- Text Box: To add text, click the
Text Boxbutton (T icon), then click on your screenshot where you want to add text. You can type your text directly and adjust the font, size, and color using the text style options. - Drawing: For freehand drawing or sketches, select the
Sketchtool (the scribble icon). This is great for circling, underlining, or drawing arrows. - Shapes: You can add shapes (like rectangles, circles, or arrows) by clicking on the respective buttons. Once added, you can change their color, border, and size.
- Signature: If you need to add a signature, click on the
Signaturetool. You can create a new signature using your trackpad or camera.
- Text Box: To add text, click the
-
Customizing Markups: Once you've placed a markup, you can move it by dragging, or resize it by dragging its edges. To change its color, thickness, or style, select the markup and then make adjustments using the toolbar options.
-
Saving the Marked-up Screenshot: After marking up, simply save your edited screenshot by clicking
File > Save, or useCommand (⌘) + S. You can also export it to a different format by selectingFile > Export.
Method 2: Using the Screenshot Utility for Quick Markup
For quicker, less complex markups:
-
Capture the Screenshot: Press
Shift + Command (⌘) + 5to open the Screenshot utility. This tool allows you to capture the entire screen, a window, or a selected portion of the screen. Once captured, a thumbnail of the screenshot appears in the corner of your screen. -
Quick Markup: Click on the thumbnail before it disappears. This opens the screenshot in a quick markup view where you can draw, add shapes, text, or even sign.
-
Editing and Sharing: After marking up, click "Done" to save to your desktop, or use the Share button to send it directly from the utility.
Preview and the Screenshot utility work great for basic markup. But if you need to share your annotated screenshots with others — clients, teammates, or collaborators — you'll notice a gap. Both tools save the file locally. Getting it to someone else still means attaching it to an email, uploading it to a chat app, or dragging it into a cloud folder. That's where Method 3 comes in.
Method 3: Smmall Cloud — Markup and Share in One Step
Smmall Cloud is a Mac app that combines screenshot markup with instant sharing. Instead of marking up a screenshot, saving it, and then figuring out how to send it, you do everything in one flow: capture, annotate, and get a shareable link.
Here's how it works:
- Capture a screenshot using Smmall Cloud's built-in capture tool or your usual keyboard shortcuts.
- Open the markup editor — annotate with arrows, text, shapes, and highlights. You can also blur or pixelate sensitive information like emails, passwords, or personal data — something the built-in macOS tools can't do.
- Click share — your annotated screenshot uploads to the cloud and you get a link instantly. Paste it anywhere.
The recipient opens the link in their browser. No file to download, no attachment to dig through. They see your annotated screenshot on a clean, branded page.
Why Use Smmall Cloud for Screenshot Markup?
- Blur and pixelate — Redact sensitive info before sharing. The built-in macOS tools don't have this.
- One-click sharing — No separate upload step. Markup and share are the same action.
- Branded share pages — Your screenshots appear on a page with your name and logo, not a generic file host.
- Link analytics — See when someone views your screenshot.
- Screen recordings too — Record your screen, annotate, and share with the same workflow.
If you share screenshots once in a while, the built-in tools are fine. If you share them regularly — for bug reports, client feedback, documentation, or team communication — the markup-to-link workflow saves real time.
Which Method Should You Use?
| Feature | Preview | Screenshot Utility | Smmall Cloud |
|---|---|---|---|
| Text annotations | Yes | Yes | Yes |
| Shapes and arrows | Yes | Yes | Yes |
| Freehand drawing | Yes | Yes | Yes |
| Blur/pixelate sensitive info | No | No | Yes |
| Instant shareable link | No | No | Yes |
| Branded share page | No | No | Yes |
| View analytics | No | No | Yes |
| Screen recording | No | No | Yes |
| Price | Free (built-in) | Free (built-in) | $8/mo |
Use Preview when you need detailed annotations on a screenshot you'll keep locally or attach to a document.
Use the Screenshot Utility when you need a quick annotation right after capturing — circle something, add a note, and save.
Use Smmall Cloud when you need to markup and share screenshots regularly. The one-step flow from annotation to shareable link eliminates the friction of saving, uploading, and sending files separately.
Try Smmall Cloud free for 2 weeks — markup, upload, and get a shareable link in one step.